
Course Creation and Settings: Course Creation Wizard (Admin)
The ‘Course Creation Wizard’ allows QMplus administrators to be able to easily create new QMplus courses using their school’s template or using another course that they have access to.
This guide covers:
- How to create a new course area in QMplus using a template.
It assumes that you have QMplus Administrator access.
You will need the following information:
- Course full name (shortcode followed by title and year, e.g. GEG4205 – Environment, Nature & Society -2020/21)
- Course shortname (shortcode followed by year, e.g. GEG4205 -2020/21)
- Course ID (shortcode followed by semester ref and year, e.g. GEG4205-A21) – you can get this from SITS. Double check the Semester for this course area, it may be that it is only for Semester B and you will have to add the code e.g. GEG4205-B21.
- Course category (school/department/faculty, e.g. HSS, Geography)
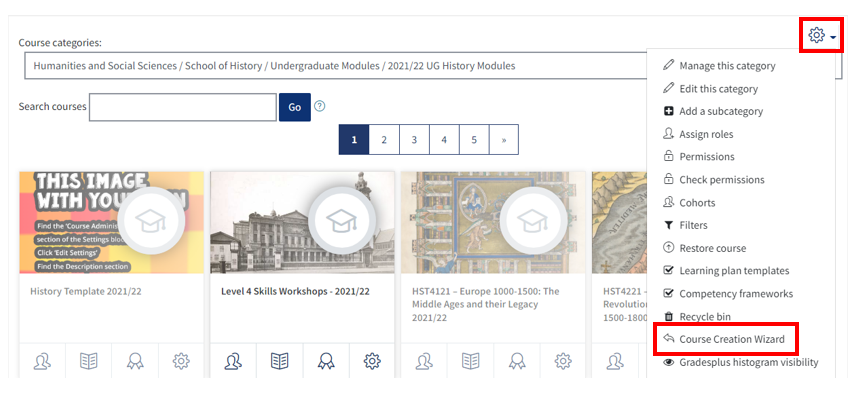
To use the course creation wizard, QMplus administrators should navigate to their school or departments category pages on QMplus. This can be done by clicking on ‘All Modules ‘ from the QMplus header at the top of the page.

- Once you have located the school category, click on the ‘Course Creation Wizard‘ link located in the drop-down ‘Actions menu’ from the gear icon.
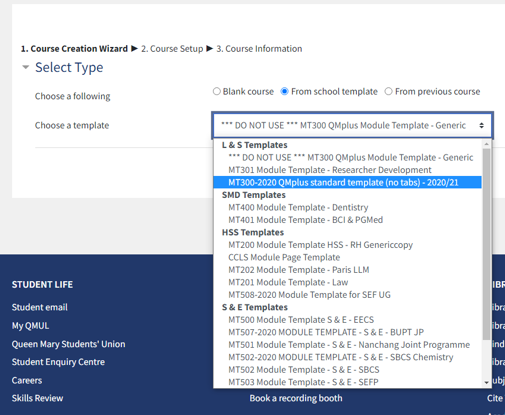
- Administrators will then be presented with 3 options to create a new course:
- Blank course
- From school template
- From previous course
- Select ‘From school template’, administrators can choose from the drop-down menu the appropriate template for their School/Department.
(For the current standard QMplus template, please select the MT300 template as highlighted below, You may need to raise a ticket if you find that you do not have access to the template).
- Click ‘Create Course‘ button
- Follow the steps, and click ‘Next‘ when presented
- The process begins by automatically making a backup of the template, and then creating your new course area with the template.
- Give your new course a name (full and short) and select the category where the course should appear.
- Click the ‘Create Course‘ button
- The new course will be created and ready for you to use. Remember to enrol teachers and students onto your new course area! Please note: by default this course will be visible to students upon creation.
Please note, you may want to hide your course area from students while you make changes and populate the content. You can do this by going to ‘Edit Settings’ and changing the course visibility to ‘hide’ then scroll down and click ‘save and display’. Don’t forget to show the course when you are finished!
