Working with breakout rooms in Teams
Breakout rooms allow you to divide meeting participants into separate sessions which can be used for small group activities or discussions. As meeting host, you have full control over the number of rooms created, who can join each room, how long the breakout sessions will last, and have the ability to move between rooms at any time.
This is an excellent feature for adding collaborative elements to online classes or webinars, particularly with a large number of attendees where facilitating meaningful interactions can be challenging. Breakout rooms can also give participants access to features which may be restricted in the main room, such as their microphone, camera, and screen sharing.
Like any group activity, it can be helpful to plan any breakout activities in advance. For example, you may want to consider:
- the number of participants per group
- timings for the breakout activity
- clear instructions for the activity
- materials participants may need to work on
- any expected outputs and if participants will report back to the main room
- assigning roles during the breakout session to ensure activities run smoothly
This guide covers:
Creating breakout rooms
In order to initiate a breakout session during a meeting, start by clicking the Breakout Rooms icon in the toolbar at the top of the window.

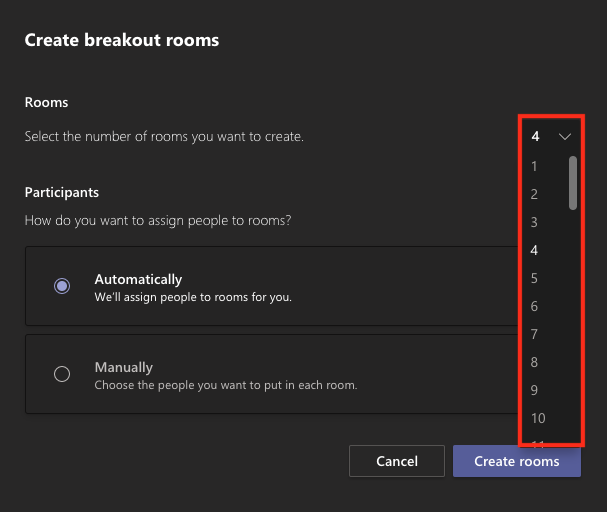
Use the ‘Create Breakout Rooms’ window to select the number of desired breakout rooms (maximum of 50) from the dropdown menu.
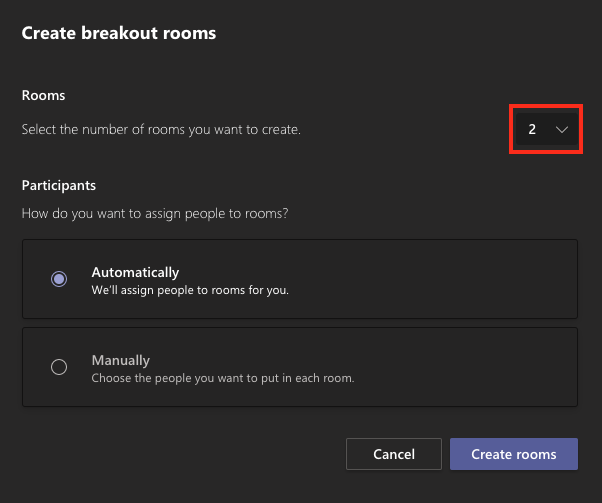
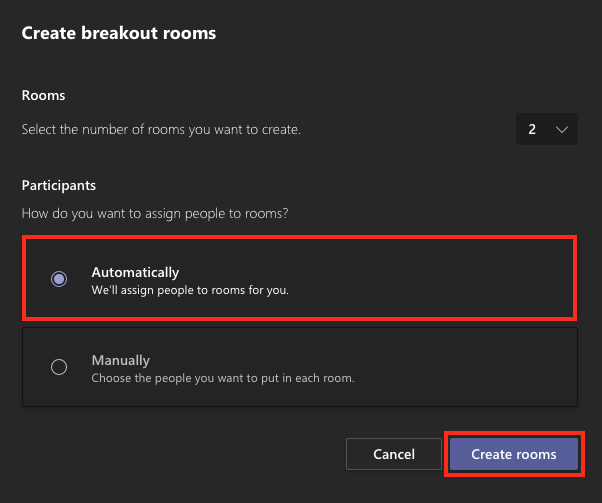
You can assign participants automatically (random allocation) or manually (not recommended for large groups). Once configured, click Create rooms.
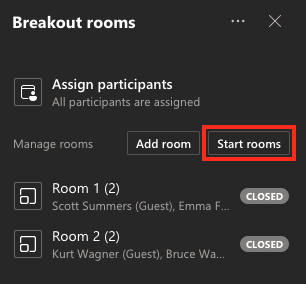
The breakout rooms panel will open on the right side of the meeting window. Click Start rooms to move participants into separate rooms.
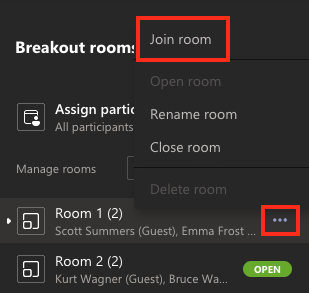
You can move between breakout rooms at any time. Select the ‘…’ More actions icon beside the room and select Join room from the menu. You can leave a breakout room or repeat this step to join other rooms.
Manually assign participants
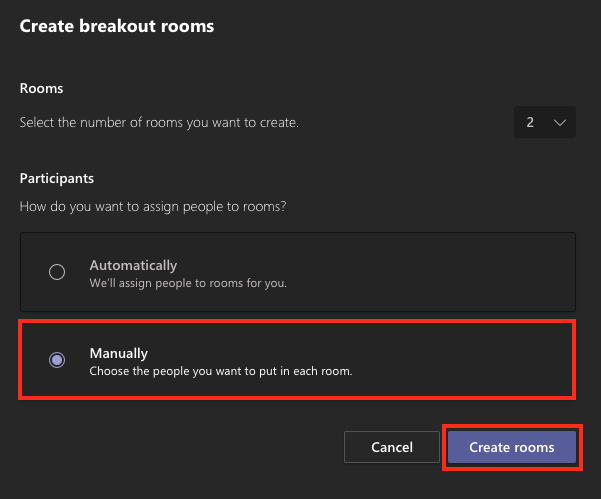
Use the following steps to manually assign participants to breakout rooms or assign participants who joined a session after the breakout rooms have already started. Select Breakout rooms from the meeting toolbar, choose the desired number of rooms, click Manually, and Create rooms.
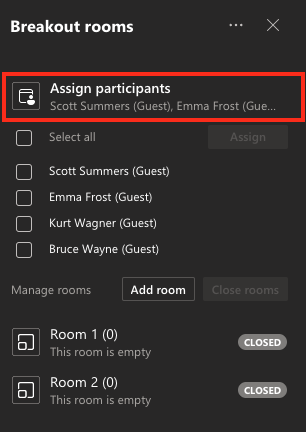
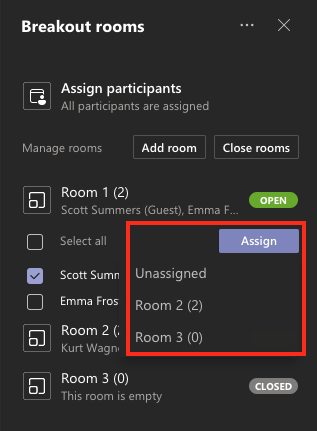
Using the Breakout rooms panel, click Assign participants to reveal a list of participants currently in the meeting.
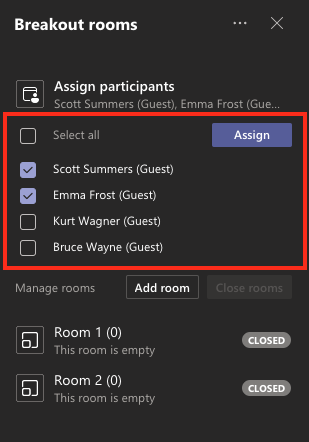
Tick the box beside the names of each participant you would like to assign. Click the Assign button.
A list of available rooms will appear under the Assign button, choose a room to move the selected participants.
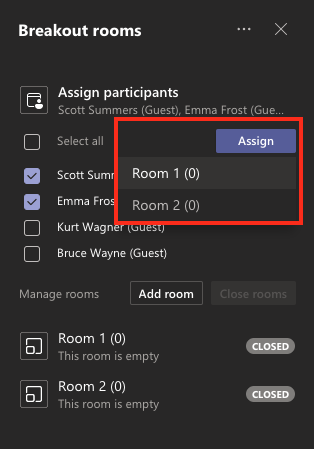
You can also move students between breakout rooms in the same way. Click the name of the room to view a list of participants. Tick the box beside their names and click Assign. This will allow you to select an alternative room where the selected participants can be moved.
Note: Unless the host unassigns participants from their breakout rooms, the same rooms and room assignments will be used by default for subsequent breakout sessions.
Managing breakout sessions
Making an announcement an easy way to communicate with all participants without needing to move between all of the breakout rooms. Using the breakout rooms panel, click the ‘…’ More actions menu and select Make an announcement to open a text field.
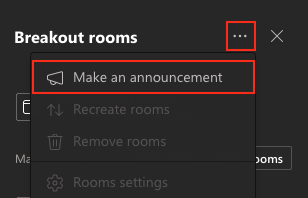
Enter your message and click Send to have the announcement appear in the chat panel in each separate breakout room for participants.
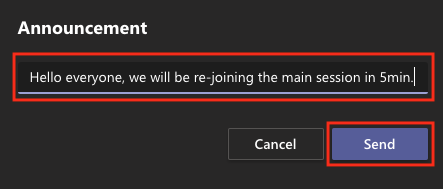
The message will display for participants like the example below:

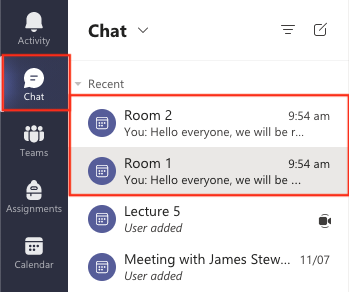
You can also join any of the breakout room chat areas using your main Teams window by selecting the Chat tab and opening the relevant chat area.
You can recreate the breakout rooms if you would like move the participants into different groups or change the number of rooms. In the Breakout rooms panel, open the ‘…’ More actions menu and click Recreate rooms.
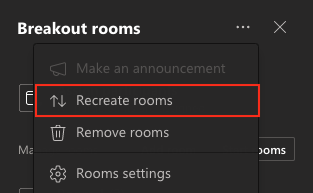
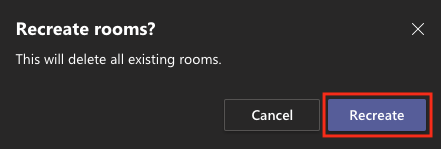
You will be asked to confirm if you would like recreate the breakout rooms, deleting the existing rooms. Click Recreate to confirm.
This will open the Create breakout rooms window where you can change the number of breakout rooms using the Rooms menu. Click Create rooms to generate a new set of rooms.
Follow the instructions above to assign participants to the new rooms.
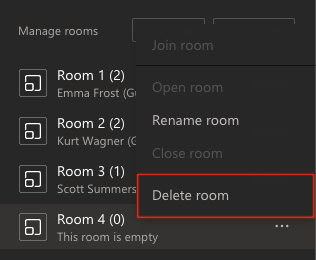
If you need to delete a single room, open the ‘…’ More actions menu beside the room you would like to remove. Select Delete room to remove it from the list.
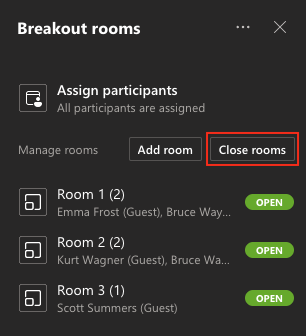
When you are ready for the breakout session to end, click Close rooms to recall participants back to the main meeting room. Depending on your meeting settings, participants can choose to return immediately, or will automatically return to the main room once the session timer ends.
Breakout room settings
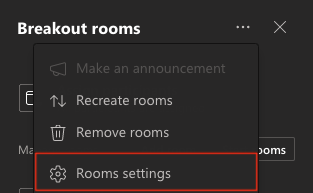
You can adjust the breakout room settings in the Breakout rooms panel by opening the ‘…’ More actions menu and selecting Rooms settings.
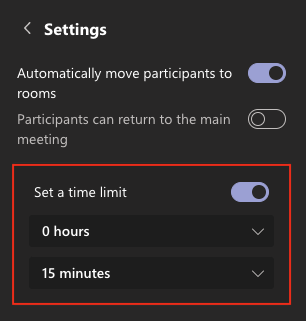
From the Settings panel, you can allow Teams to automatically move participants into their breakout rooms when you start a breakout session, allow participants to return to the main meeting room any time, or set a default time limit for the breakout session. After the time limit ends, breakout rooms will automatically close.
Tips for running breakout sessions
- Be sure to share any required files, communicate tasks, and assign roles prior to opening the breakout rooms. Users may be confused about what to do upon leaving the main room if instructions are not clear. You are unable to share your screen to all groups once breakouts begin.
- Participants who join late, after the breakout session has started, will need to be manually allocated to a breakout room.
- You can manually re-assign or move students between rooms at any time.
- Co-hosts can move between rooms and assign participants to rooms. If you have a large number of participants, additional facilitators can be helpful for assigning users to rooms and moderating discussions.
Did this answer your query? If not, you can raise a ticket on the online Helpdesk or email: its-helpdesk@qmul.ac.uk . Alternatively you can also request a particular guide or highlight an error in this guide using our guides request tracker.
Produced by the the Technology Enhanced Learning Team at Queen Mary University of London.


