
Using Mentimeter safely
Making Mentimeter a safer space for students
Mentimeter is an excellent tool for promoting student interaction and participation both in-person and online. A significant part of the appeal is the anonymity of participants so that it offers a ‘safe space’ for students to attempt to answer questions that they are not sure about without fear of embarrassment.
Unfortunately, experience has shown that the anonymity also carries with it the risk of disruptive or even abusive comments being posted and viewed by other members of the course. This guide aims to show how to mitigate this risk by using the Mentimote remote control, filtering language and moderating comments.
Please ensure that every effort is made to follow this guide and ensure that you promote a safe collaborative space for your students.
Mentimote
Mentimote allows you to control your slides wherever you are in the room by using your smartphone as a remote. It allows you to moderate a Q&A session, navigate between slides and reference your presenter notes.
To find out more about what the Mentimote is and how to make the most of it, watch this explanatory video.
This page gives you detailed information about the Mentimote.
How to open the Mentimote from your smart device
-
Log in to your Mentimeter account from your smart device
-
Open your presentation
-
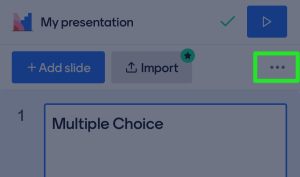
Click on the three dots in the upper right corner to open the setting menu
-
Select “Mentimote”

Filtering language
Although it is a very rare occurrence, students have been known to use profane language in comments in anonymous collaborative spaces. Mentimeter offers a profanity filter to help eliminate this risk.
This feature is not activated by default for all presentations so you will need to check and follow the steps below in order to switch it on as needed.
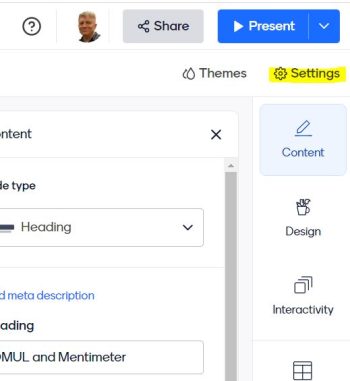
In order to access the profanity filter settings, open the relevant presentation and click on ‘Settings’
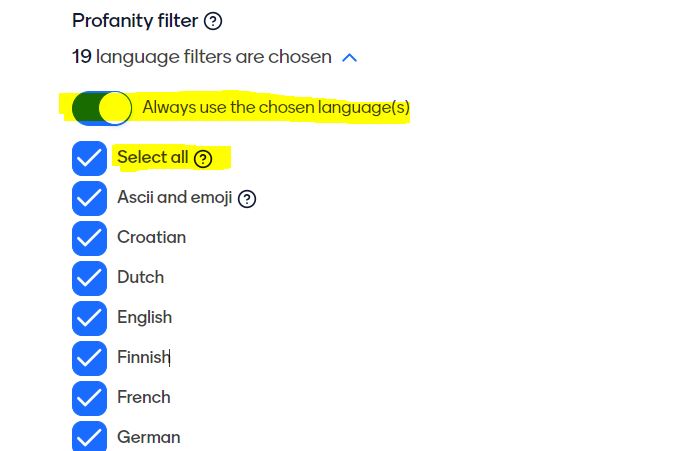
From within the settings menu, scroll down to find the ‘Profanity filter‘. Select ‘Always use the chosen language‘, then ‘Select all‘ to prevent profanity in any of these languages from being included. This will set the profanity filter for this and all future presentations.
It is worth noting that profanity filters are not foolproof and people are capable of introducing words that are not included, so comments in question types that allow free expression should be moderated.
Moderation
The safest way to prevent abusive language and comments appearing during your presentations is to use the moderation options. Note that with large classes containing many students this may be a more difficult task without an assistant to help you, in which case you may wish to avoid questions that allow for free expression. This would include Q&A sessions, word clouds, and open question types.
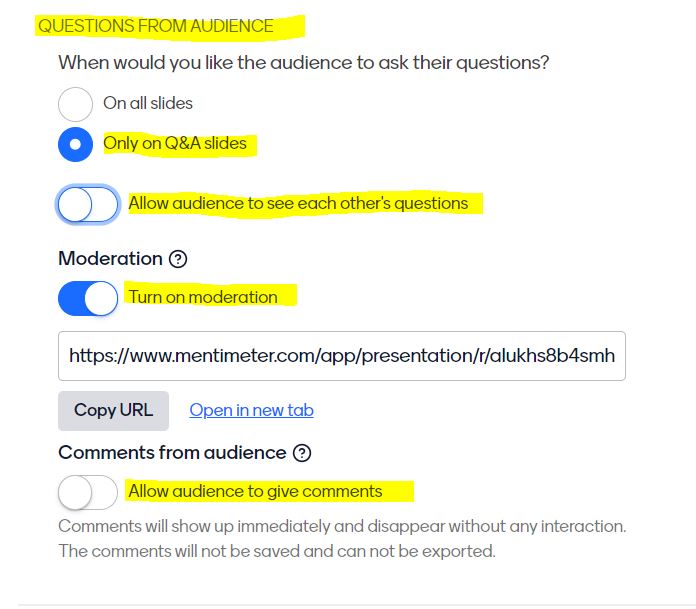
To enable moderation, go to settings within the relevant presentation and scroll down to ‘Questions from audience’ and take the following steps:
select ‘Only on Q&A slides’ – this means voters can only submit questions when the “Q&A” slide is presented
do not select ‘Allow audience to see each other’s slides’ (this means the audience won’t be able to see other voters’ questions, and they won’t be able to upvote questions).
select ‘Turn on moderation’ – this means that no questions will be shown to the audience until you manually approve the questions through the provided link
do not select ‘Allow audience to give comments’
How to moderate your own session
The moderation feature is designed to be easy to use so that you can moderate your own Q&A session while you’re presenting. To ensure a smooth experience, here are some recommendations:
If you have activated Q&A for your whole presentation, you can use the time when the participants are voting on a question to moderate incoming questions during the presentation. This saves you from needing to moderate all the questions at the end.
You can try and adapt your presentation for self-moderation by letting the audience spend time thinking about subjects or discussing something in smaller groups, and use that time to moderate.
Please note that “word clouds” and “open-ended” votes cannot be moderated at the moment. However, when you display them on the screen, you can click “x” to quickly delete a vote if needed.
Let someone else moderate your session
If you are fortunate enough to have someone who can assist you, send the link to allow them to filter out the questions before they show up on your screen for everyone to see. Your moderator won’t need access to their own licence in order to moderate; anyone with access to the moderation link will be able to help you with moderating incoming questions.
