
Using and managing badges in QMplus
This page will look at how to add badges to a module, how students access badges and how to manage badges that have already been added.
What are digital badges and why use them?
Digital badges (also known as ebadges) are a validated indicator of accomplishment, engagement, skill, or interest that can be earned in various learning environments. Digital badges are employed in a variety of ways, serving different functions depending on the activities with which they are associated. Badges are often thought of as rewards but have been found to be effective in contributing to goal setting, engagement, motivation, instruction and group interaction. Badges are portable when associated with a digital ‘backpack’ such as badgr.io, which is used by default on QMplus, carrying with them information about assessment, evidence and other intrinsic metadata.
Badges can be used to represent competencies and have a more granular approach than traditional certificates or diplomas.
Adding a module badge
Teachers can add a badge to a module by going to
Module actions menu (cog) > More > Course administration > Badges > Add a new badge
Name and expiry date
Add a name for the badge and a description, then upload an image for the badge as it will appear when awarded.
At this stage you can set the badge expiry date, or choose ‘never’ if you do not wish the badge to expire – note that this setting will be locked when the badge is published.
Criteria
For module badges, you can choose from:
Manual issue by role (Choose the roles that can manually award the badge)
Course completion (Completion tracking must be enabled)
Activity completion (Activities with completion criteria enabled)
Previously awarded badges (Other course badges or site badges as criteria)
Competencies (Achievement of selected course competencies)
![]()
Once criteria have been set, you are returned to the Manage badges screen where you must “enable access” for the badge to be available:
![]()
Awarding Badges
Badges may be awarded manually from
Module actions menu (cog) > More > Badges > Manage badges > Recipients
or, when badge access is enabled, by clicking on the badges icon on the navigation drawer from within the relevant module.
![]()
Revoking Badges
If a badge is awarded my mistake, it may be revoked from the ‘Badge recipients’ page. Click the badge in question, click the Award button, select the person whose badge you wish to revoke and click ‘Revoke’.
Only badges which were awarded manually may be revoked.
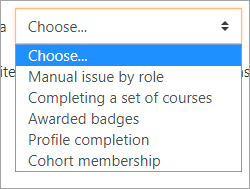
Adding site badges
An administrator can add a site badge from
Site administration > Badges > Add a new badge
While the settings are basically the same as for a teacher in a course, the criteria are slightly different because of the global nature of the badge. These are: manual issue by role; completing a set of courses or profile completion, cohort membership and previously awarded badges. As part of the profile completion criteria, a badge may be awarded for uploading a profile picture.
In order to be able to award a site badge based on completing one or more courses, completion tracking needs to be enabled in the site and relevant courses. In each course, activity completion must be set for the chosen activities, which must be then checked in the course completion settings.
Earning badges
Once the criteria have been set and the settings completed, the user can start earning the badge.
For users to be able to earn a badge, a badge creator/administrator needs to enable access on the overview page or “Manage badges” page (as shown).
![]()
Normally badges are awarded to users automatically based on their actions in the system. If a user has completed all necessary requirements, they are issued a badge and sent an email notification.
Backpacks
A digital badge backpack is an online space to collect, organize and share the digital badges you’ve earned.
Enabling users to connect to an external backpack means they can add badges from their Moodle site to their backpack and also display badges from other sites in their Moodle profile.
The backpack badgr.io is provided by default. Admins can add additional backpacks, for users with an account on eu.badgr.io, ca.badgr.io or au.badgr.io.
To manage backpacks, go to
Site administration / Badges / Manage backpacks

To find out more about backpacks, visit the Moodle Docs backpack page.
